

How To Change Color Fill In Photoshop
In that location are a variety of easy ways to alter the colour of layers in Photoshop, whether you're working with shapes, images, or text. The but trick is that each blazon of layer requires something a lilliputian different for editing the color.
To change the color of a layer in Photoshop, click on the foreground color at the bottom of the toolbar. In the colour picker that appears, select a new color for the layer and click OK. At present select your desired layer and press Alt or Option + Delete to fill the layer with the active foreground color.
Now that is the near basic and quick way of irresolute the color of a layer in Photoshop, only obviously won't piece of work for all color-changing needs. And then let's brainstorm to break down how to modify the color of any layer type individually instead!
How To Fill A Layer With Color
To fill a layer with color in Photoshop, first select your desired layer in the Layers Console. Next, click on the foreground color at the bottom of the toolbar and select a new layer colour. With a color chosen, printing Alt + Delete (Windows) or Selection + Delete (Mac) to make full your layer with the color.
This technique works best when filling in a transparent layer with color since it will encompass everything upwardly. If y'all have something on your layer that you don't want to become rid of, and then this detail method isn't ideal.
However, it works great to create solid-colored layers for calculation to your background!
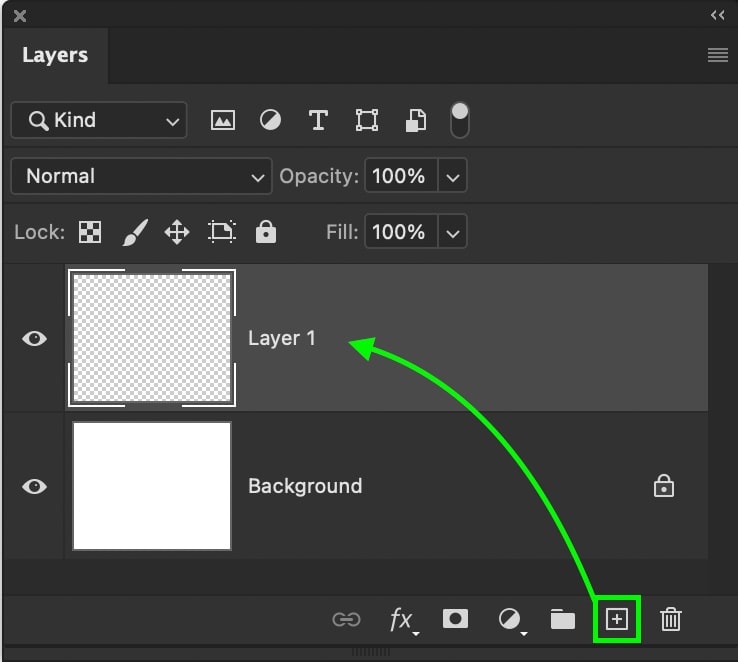
For the sake of example, I'll kickoff create a new layer by clicking on the new layer icon. I'll then make sure that the new layer is selected since that'due south the one I want to fill with color.
Adjacent, you'll need to choose a foreground color. This is the height box of the two color boxes found at the lesser of the toolbar. Click on it to bring upwards the color picker.
Within the color picker, cull a color you want to fill up your layer with, then press OK.

Now yous will have an updated foreground color, and you're fix to fill the layer!

Making sure the layer is selected, press Alt + Delete (PC) or Choice + Delete (Mac) to fill the layer with the foreground color. Now you're left with a solid color covering the entire layer!

In terms of general color fills, this is the quickest and most bones way of doing things. In the next section, y'all'll learn almost make full layers that offer a similar result simply are easier to edit afterward!
How To Modify Fill up Layer Color In Photoshop
To change the color of a colour fill layer in Photoshop, beginning, double click on the color make full layer icon in the Layers Panel. Then, in the color picker that appears, select a new color for the fill layer and click OK. Now the colour fill up layer has been changed.
Depending on which type of make full layer you lot are working with, the color-irresolute technique varies a scrap. So permit's start with color make full layers!
ane. Color Fill Layers
Colour fill layers act as a unmarried layer dedicated to displaying a unmarried color. They piece of work well for adding as image backgrounds or using with a clipping mask to modify the color of rasterized shapes. Unlike the previous color fill up method you learned, a color fill up layer is much easier to edit.
To create a color fill layer, get to Layer > New Make full Layer > Solid Color.

In the color picker that appears, select a color for your color fill layer and click OK.

At present you are left with a color fill layer that fills your entire canvas with your chosen colour. If yous need to change this color, simply click on the fill layer icon to reveal the color picker.

Since these types of layers are and so like shooting fish in a barrel to edit, it'southward an effective way of changing the color of an entire layer in Photoshop!
2. Slope Fill Layers
The next type of fill layer in Photoshop is called a slope fill layer. As the proper noun suggests, these types of layers fill up your image with a gradient rather than a solid colour.
To create a new gradient fill layer, get to Layer > New Fill Layer > Gradient.

In the slope make full dialogue box that appears, y'all have all the options for editing your gradient. To change the color of your slope, you need to click on the gradient editor.

Inside the gradient editor, you tin can choose between a multifariousness of preset gradients available in Photoshop. If you aren't finding what you need, you can create a custom gradient by clicking on the colour swatches beneath the gradient preview.

Once you're happy with your slope, click OK to get out the gradient editor and the slope fill dialogue box. Now yous're left with a slope filling your canvas rather than a solid color!
Like with a color fill layer, you tin can change the color of gradient make full layer by double-clicking on the layer icon. This volition reopen the gradient fill dialogue box to let for easy color and style changes to the slope.

Now that you take a solid handle on how to change the color of an entire layer using keyboard shortcuts or make full layers allow'south starting time getting specific. Next, you'll learn how to alter the color of shapes and objects in your layers!
How To Alter The Colour Of A Shape Layer
To change the color of a shape layer in Photoshop, select the shape layer and admission the Shape Tool (U). This will reveal a variety of options in the upper setting bar for editing the shape. To change the color, click "Fill" and select a new color for the shape.
This same procedure works for any shape layer that you piece of work with. From circles, rectangles, polygons, and more than, information technology'southward all the same steps!
Offset, you lot demand to brand sure your shape layer is selected past selecting information technology in the Layers Panel. This way, Photoshop knows what shape you are trying to edit.

Then to reveal the settings available in the upper setting bar, yous need to make sure the shape tool is active. You can find this tool near the lesser of your toolbar or press U on your keyboard to access it.
Within the dissimilar settings, look for the one called "Fill." Click on information technology to reveal your fill color options where you tin can choose between a diverseness of preset color swatches. If you lot need a more custom color for your shape, click on the color picker in the upper right corner.

Afterward you click on a new fill colour, observe how the colour of your shape changes too! Y'all can rinse and repeat this process multiple times if needed until you settle on the perfect shape colour.

Now, if y'all're working with a rasterized shape, the fill up choice won't affect your shape. Instead, you'll need to use a different technique that I outline in detail here.
How To Change The Color Of A Text Layer
In that location are a few unlike ways to modify the color of text layers in Photoshop, merely the easiest is with the Grapheme Panel. This panel offers a variety of manner settings for your text layers and allows for quick color adjustments.

First, you demand to access the Graphic symbol Panel by going to Window > Character to reveal the panel.

Then select your desired text layer in your Layers Panel.

Now get to the Color pick within the Character Panel and select a new color from the color picker that appears. Once y'all're happy with the new color, click OK.


Since your text layer was selected in the Layers Panel, this color adjustment volition be direct applied to your text. The cracking thing almost this method is that you don't need to activate the type tool or highlight your text. Instead, a simple click on your layer is all that's required to change the color of your text!

At present, this is the most elementary and bones way of changing text color in Photoshop, just if y'all want to learn some more avant-garde ways to edit text colour, this tutorial volition share everything you need to know!
How To Change The Color Of The Background Layer In Photoshop
When yous start create a Photoshop project, you'll accept a groundwork layer created by default. Often, this is set to white, but you tin rapidly change its color whether you're creating a new certificate or already accept one started.
– Changing The Background Layer Color Of A New Projection
If y'all have even so to create a new document, you tin can edit the background color inside the new certificate dialogue box. To access these options, press "New" from the Photoshop start screen or press Command + N (Mac) or Command + N (PC) on your keyboard.
Here you can choose all of your settings for the new document you are about to create, including the background colour. Clicking on the drop-down menu under Background Contents, yous can choose between five dissimilar background options:
- White – Sets the background layer color to white
- Blackness – Sets the groundwork layer color to black
- Background Color – Sets the background color based on your agile background color in the Photoshop workspace.
- Transparent – Removes all color of the background layer and instead replaced it with a transparent layer.
- Custom – Allows you to choose a custom color for your background layer.

You lot tin can selection whatever background layer color yous can imagine between these options earlier ever creating a new project. Then, later pressing "Create" to open the new projection, you volition take your background layer set to the color y'all specified while creating the new document.
– Irresolute The Groundwork Layer Color Of Existing Background Layers
Some other situation you may observe yourself in is needing to change the background layer color that is already created. Rather than creating a new document, you simply need to edit the colour of your existing groundwork layer. Luckily this is super easy to do with a elementary fill layer keyboard shortcut.
First, you need to select a colour to fill your layer with. Past clicking on your foreground color at the lesser of your toolbar, choose a colour to fill your groundwork layer with.

Next, click on your background layer to select information technology and press Alt + Delete (PC) or Option + Delete (Mac) to fill up your layer with the foreground colour.


This keyboard shortcut can be used for any layer in Photoshop but works well to quickly change the background layer'due south colour.
How To Change The Color Of A Photo In Photoshop
To alter the colors in a photo, create a new Hue/Saturation aligning layer via the Adjustments Panel and identify information technology in a higher place your image. Next, select a Hue/Saturation color channel to effect within your photo, and then adjust the hue, saturation, and lightness sliders accordingly.
The Hue/Saturation adjustment layer is the well-nigh simple way of changing the colour of a photo in Photoshop since y'all can target dissimilar color channels. Breaking up your image into a variety of colors, it's piece of cake to use targeted color-changing effects anywhere in your photograph without selections.
Permit's accept a deeper look at how yous can use this adjustment layer to modify colors inside any image you work with.
To create a hue/saturation adjustment layer, click on the icon within the Adjustments Panel, or select it via the adjustment layer option at the lesser of the Layers panel.

One time created, brand sure information technology is placed to a higher place your image layer, or else your aligning won't make any changes.

Then double click on the hue/saturation layer icon to open the adjustment console. Inside this panel are various options to cull from, merely allow'southward first talk nearly color channels.
The default color channel volition exist set to "Master," which means your colour adjustments volition apply to every color range in your photo. If you want to change color globally, this is a good option, only it doesn't piece of work well for targeted adjustments.

Luckily you can hands make more specific adjustments by changing the colour channel. By clicking on the drop-downwardly menu, you can choose between a diverseness of colors. These options are the same for every photo you work with, merely the usefulness of each aqueduct volition vary depending on which colors are present in your epitome.
For example, if you selected the blue colour channel, your color adjustments would only apply to the dejection in your image.

Now within every colour channel, at that place are three adjustment sliders to help y'all edit your colors. Let's break downwards what they all mean for your editing.
Agreement The Hue/Saturation Adjustment Layer Sliders

The hue slider will alter the hue of whatsoever colour in your photograph. This hue adjustment will apply varying colour furnishings to your photos depending on which color channel is selected. This slider is the primary ane you will use to actually alter colors in an image.
The saturation slider controls the richness of the colors in your photo. By increasing or decreasing this slider, you lot can better command how colorful your prototype appears.
Lastly, you have the lightness slider, which controls the effulgence of different colors in your images. With a higher lightness setting, colors will take on a more than soft pastel look. With a lower lightness setting, they will appear more black.
Seeing The Hue/Saturation Adjustment Layer In Action
Now that you empathise how this aligning layer changes colour in a photograph let'south go through a quick example together. Offset, I'll create a new Hue/Saturation adjustment layer above my paradigm layer.
Then within the Hue/Saturation Adjustment options, I will select a colour channel to piece of work with. In most cases, you will edit multiple color channels to go all the color-irresolute effects that yous're looking for. If you aren't certain where to kickoff, simply become through each color channel in order.
To see exactly what areas of the photo will be edited, move the saturation slider to +100. This will heavily saturate every colour within your selected channel, making it like shooting fish in a barrel to meet what's afflicted.

Now that you lot know what's going to be edited reset the saturation back to 0. Then click and drag on the Hue Slider to arrange the hue of the colors of your active color aqueduct.
Afterwards editing the hue, work through the saturation and lightness sliders equally needed to finalize your updated colour hue. From there, you can repeat this process through every color channel to completely alter the colors in your paradigm.

This technique works best for editing general parts of your photograph without getting too specific. If, nevertheless, you want to change the color of an object or a slice of vesture, there'south a far more precise way of doing things.
How To Change The Colour Of An Object
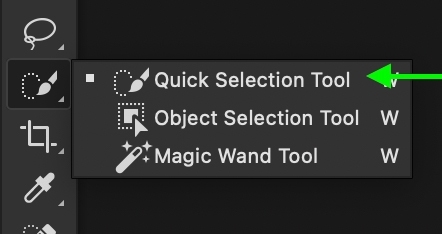
Now to alter the color of an object without editing anything else, you lot need to use a option to make your adjustments precise. There are many different ways to create selections in Photoshop, but ane of the easiest ways is with the Quick Selection Tool.
For this instance, let's alter the color of this woman's shirt with the assistance of the Quick Selection Tool and a Hue/Saturation Adjustment Layer.
Offset, admission the Quick Selection Tool in your toolbar or by pressing Due west on your keyboard.
With your prototype layer selected, brainstorm to paint over the object you want to change the color of. In this example, I will paint around the shirt to select it.

While using the Quick Selection Tool, you may run into issues where it selects things you lot practice not want. To remove part of your active selection, press the Alt or Selection on your keyboard and pigment over where yous desire to remove.
Now adding to your option volition be done past default while the Quick Pick Tool is active. However, if you need to select another place not directly connected to your other selection expanse, simply hold Shift and paint to add to the active selection.

Later on doing a fleck of refining holding Alt/Option or Shift, you will be left with a perfect selection around the object you want to change the color of. In this example, the t-shirt is perfectly selected.
With the selection complete, create a new Hue/Saturation adjustment layer. The active selection will automatically be practical to the adjustment layers mask, so your color adjustments will only target your selected object.

Opening the Hue/Saturation adjustment settings, you can work within the Chief color channel since you have already selected the expanse you lot wish to target. Past adjusting the hue, saturation, and lightness sliders, yous will only bear upon the areas that y'all selected previously.

So whether yous are irresolute the color of clothes like in this example or other objects in your photo, this method is a fast and easy mode to do so!


How To Change The Color Of Multiple Layers At Once
If you want to change the color of multiple layers at once, then yous don't take to go through each 1 individually, in that location are a few unlike ways depending on your layer types. Let's break down the procedure of changing the color of multiple shapes, text layers, and image layers at once.
Changing The Color Of Multiple Shape Layers
In this case, a few different shapes accept been created, all with different colors. Permit's say I need to make all these colors lucifer, but I don't desire to go through and alter the colour of each shape separately.
(Because who wants to spend the time doing that? Not me!)
Outset, hold the Command or Control key and click betwixt each shape layer to select them in the Layers Panel.

Once they are selected, press U to access the shape tool and reveal the shape settings in the upper bar. Then click on the "Fill" option and select a new colour to apply it to all of the selected shape layers at once. The same thing applies to the stroke color too!


Irresolute The Color Of Multiple Text Layers
Similar the last case with the shapes, now multiple text layers need their colour inverse. If you have a lot of layers, you can filter the Layers Panel to simply encounter your text layers by pressing on the T icon at the top of the console. Once filtered, agree Command or Control and click on the text layers you desire to change the color of.

With the text layers selected, open the Character Console. If you don't run across information technology, get to Window > Character to reveal it. Within this panel, click on the Color option and choose a new fill color for your text.

At present the updated color will exist added to all of your selected text layers at in one case and saves you time editing each i individually!

Irresolute The Color Of Multiple Image Layers
As for changing the color of multiple images at once, you don't need to practice anything more than create a hue/saturation adjustment layer above your prototype layers!
Adjustment layers are applied to every layer beneath them in the layer stack by default. That means you will edit all of your paradigm layers with the hue/saturation adjustment without having to do anything special. If you lot were just to apply these color adjustments to a unmarried layer, you would demand to use a clipping mask.

Otherwise, simply creating a hue/saturation adjustment layer above your other layers is all that's required to target multiple epitome layers at once!
How To Alter The Color A Layer Mask
To change the color of a layer mask in Photoshop, select the Brush Tool, so click on your layer mask to select it. Next, ready your foreground color to white (100% visible) or black (100% transparent) to edit your layer mask. Now paint on the canvas to mask the layer and change the layer mask color.
Layer masks are an essential tool to hide parts of your layers not-destructively. They work well for removing backgrounds or applying selective adjustments, but if you don't know how to edit their color, you may run across problems.
In the earth of layer masks, white is 100% visible, while blackness is 100% transparent. Therefore, whatever shade of grey between black and white simply indicates varying levels of transparency. Outside of black, grey, or white, no other colors can be used with a layer mask.
Past default, a new layer mask added to a layer will exist completely white, meaning everything on that layer is visible.
To alter this layer mask's color in this situation, you need to paint black or grey to edit the layer mask and hibernate part of your layer. Showtime, select the Brush Tool (B) and click on your foreground color. In the colour picker that appears, choose blackness to make any expanse you paint over 100% transparent.


Before you pigment on your canvas, click on your layer mask to ensure it is selected. Once selected, yous volition see a white highlight around the layer mask.

From hither, begin to pigment on your canvas to alter the colour of the layer mask and mask out your layer. If you need to make parts of your layer visible over again, simply change the foreground color to white, select the layer mask, and paint over your image once again. This time y'all volition make the black parts of the layer mask visible in one case once again!

Then at present you know how to change the color of whatsoever shape layer, text layer, prototype, or layer mask in Photoshop with ease. Although in that location is a lot to call up, the techniques yous learned here volition assist you lot breeze through your colour-changing edits. Now, if you lot're looking to improve your colour-changing skills even further, check out this next tutorial on how to add color to black or white objects in Photoshop!
Happy Editing!
Brendan 🙂

Source: https://www.bwillcreative.com/how-to-change-the-color-of-objects-text-and-shapes-in-photoshop/
Posted by: wassermanquiuse84.blogspot.com
0 Response to "How To Change Color Fill In Photoshop"
Post a Comment